
Implementing Stop in a Synchronous Integration.


Introduction

In this blog I will be explaining on overcoming the limitation of having a stop action in a synchronous Integration.


Main Article

The main goal of this article is about achieving to stop the synchronous integration wherever its required.

In case of Asynchronous Integration by default we get at stop action at the end of the Integration whereas in synchronous integration by default we can’t use it.

But when you want to stop the integration abruptly at any point, how to achieve it.

There are three ways to do it:

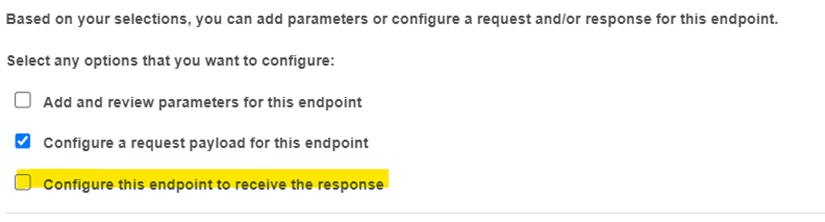
1)      If you want to get rid of the return at the end and convert it to stop, in other words if you want to convert synchronous to asynchronous, uncheck the configure response payload option in the trigger.


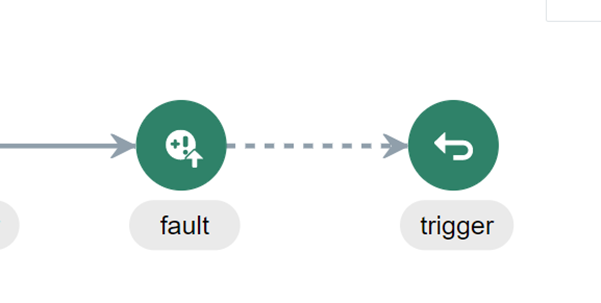
2)      Use throw new fault action at point to stop the integration abruptly irrespective of if it is synchronous or asynchronous.


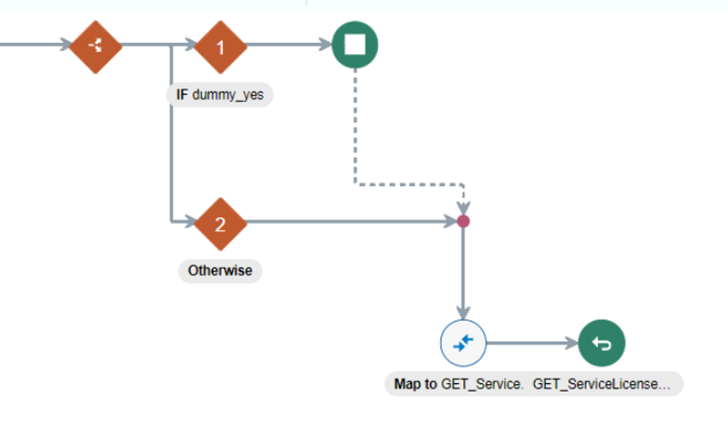
3)      This one may or may not work in some cases…drop a choose action and on the TRUE path drop the stop action as shown below:


Hoping that above shared information is helpful, and you had learnt something new today.


Please share and comment to encourage me to share more such interesting content.


-Preetham Konjeti 


Comments

Popular posts from this blog

Convert App based Integration to Scheduled Integration without wrapper in OICS

we all know that converting a scheduler integration to REST is quite easy , where as the reverse is not possible and the only way to achieve it is through creating a wrapper scheduler integration and invoking the trigger one as child from there. But there is another way through which we can achieve the direct conversion. For that please refer to below example. Note : Every step mentioned has to be done very carefully Create Scheduler Integration. I’ve created a base one in which it invokes a SOAP service.  I’ve created a small trigger integration which I’m going to change to scheduler without any wrapper. Please follow the below steps to convert rest based to scheduler:     1)    Export the integration.     2) Rename the iar file to zip.     3) Now unzip the file.     4)    Compare the properties files of both scheduler and rest based integration and make the changes to rest based as per the scheduler integration After changes Now open the resources folder: Move the scheduler resour

ChatGpt X Oracle Digital Assistant Integration

  Introduction In this article I will be explaining about integrating the ChatGpt with Oracle Digital Assistant. NOTE : This is not a suggestion to have ChatGPT in your ODA, this article is just to showcase the flexibility of the ODA to easily integrate with anything. Main article ChatGPT ChatGPT is an AI language model developed by OpenAI, capable of processing natural language input from users and generating coherent and relevant responses. It has been trained on an enormous corpus of text data using unsupervised learning, allowing it to generate responses that are not just grammatically correct, but also contextually appropriate and engaging. ChatGPT is particularly useful in scenarios where there is a need for rapid and accurate responses to user queries, such as in customer service or personal assistants. However, it may struggle to generate appropriate responses in certain situations and may not be suitable for scenarios requiring a high degree of personalization or cus

Backup Integrations of an Instance with a single click using OIC

  Introduction One common mistake that most of OICS developers make is not taking the backup of their integrations religiously and if they want to take backups clicking on the export of the integrations individually could be quite tedious. Main Article In this blog I will be explaining about automating the backup process in OICS. Below is the order of the steps that are to be followed: STEP:1 1) Configure a Rest trigger connection as shown below. Provide the below payload in the request section:     {   "IntegrationName”: "" } STEP:2   Configure the new rest connection as mentioned below. (This basically list downs all the integration details as per the provided name).   Provide the Query parameters as below:   Provide the response payload as below: {   "hasMore" : "false",   "items" : [ {     "id" : "",     "name" : "",     "lockedFlag" : &quo